Captains log, Star date 569701: It is time for the grand unveiling of our group script for the YMCA project. We drew up a rough version at around week 3 but I've only just drawn a neater version and scanned it in this week!
Feast your eyes! It should be quite funny once we've finished with it, hopefully!
I have sent an email round our group stating what needs to be done for next week.
Keeley and Amy are to have all the props completed, Matt is to bone and clothe a character and I am making the room and lights/lighting rig. We are also thinking of what songs to use as well.
I don't know a huge amount about strobe lighting in max and neither does the internet it would seem as I cannot find any tutorials what so ever on the subject that do not require Vray (an external renderer) which the university does not have. So I ended up having to make the lights on my own using trial and error to achieve the flashing effects, which I did manage to achieve so a bit of perseverance paid off better than Google for once!
A sneak preview is below:
Amazing I know but what can I say?!
Wednesday, 29 October 2008
Tuesday, 28 October 2008
wk 6: So...
Captains log, Star date 569700: Thanks to the tutorial guy and my innate genius..(pfft!) I have completed the head using such tools as Edit Mesh, Attach, Extrude, Weld, UVW Unwrap, Symmetry, Turbosmooth and many millions of other things as well!
So what did I learn? Not the masses that I was hoping for! Not the meaning of life either. What I did learn was valuable and I am glad I took this module. My only wish would have been to endure the tutorials with the soothing voice of Laurence Fishburne, rather than a single male living with his mum, with a basement he calls a 'command centER'!! No offense meant really! By his guidance I somehow managed to complete the momentous task of head modeling!
Thankfully I had a slight advantage as I have been modeling an Aston Martin V8, so the whole Mesh-shaping thing wasn't new to me although I did pick up alot of useful pointers, especially when it came to UVW mapping!
To conclude I thoroughly enjoyed this module and have pushed my boundaries of knowledge back considerably. My only reservation was the solid days of sitting at a screen manically massaging out the RSI I have now developed in my thumb! Nevertheless! it has been an emotional experience and one that I shan't go out of my way to remember, but it has been invaluable all the same!
wk 6: Voila!
Captains log, Star date 569699: I have finally finished everything...kind of! Below are a few screen shots of my failed attempts at making hair! It isn't the easiest thing to do because every time I comb my fringe across it sticks out and every time I flatten it again it goes straight again! Arrghh, I had hoped that the Re-comb tool would work, but it only helped initially, after that it made things worse! Also max was playing up as well so I followed my motto:
"If at first you don't succeed, reboot" But that didn't help either so I gave up!
Instead I decided to do a quick animation with my face. Being the messed up person that I am, everything has to be funny so I did a quick music video instead!
Unfortunately I handed my video in but I can't attach it because the file is too large!! nooooooo.
Sunday, 26 October 2008
wk 5: Britains most wanted!
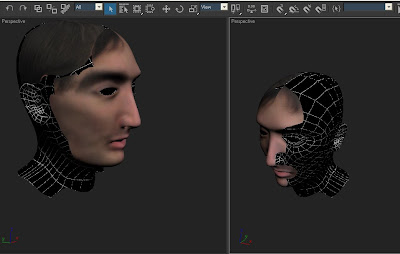
Captains log, Star date 569698: I have finished texturing, bump and specular mapping below are a couple of mugshots of my progress! I am hoping to add some proper hair soon too! The hardest part was lining up the separate ear map from the rest of the face. By the time I had done that I could only muster up enough energy to throw together a couple of eyes, and the spheres were slightly distorted so my eyes look a bit skew wiff! I will probably alter them at a later date.
Tuesday, 21 October 2008
wk 5: Face glorious face!
Captains log, Star date 569698: I have finished modeling hurrah! Now it is just a simple tedious case of texturing! This involved the modifier Unwrap UVW and then making sure none of the verteces were overlapping and were space out evenly to ensure a smooth well spaced map.
Once all the checkered boxes we're even-ish I could do the same for the ear. This was because the ear is such a complex object that it needs more space to flatten out.
After this I moved across into Photoshop, and using the photos that have served as my reference plates before I made a flat picture of my face that I could wrap around my mesh in 3Ds max. Luckily both programs are powerful enough to allow for instant updating once saved so fine adjustments can be made and the results could be viewed in 3D instantly.
Below are screen dumps of my progress listed chronologically!
Above is a checkered map displaying how even the material with stretch across the face.
Below is the Unwrap UWV mapping screen which I used to alter the grids for my face.
Above is my face in the middle of the texturing process.
Below are exported maps from 3Ds max.
Above is what my face looks like in Photoshop.
So far so good! Just an ear to map now.
Monday, 20 October 2008
wk 5: The Final Front-ear
Captains log, Star date 569697: I have finished the ear after much screaming, shouting and throwing-my-laptop-out-of-the-window-ing...oh and a LOT of vertex tweeking. I did this using the same principal that I employed for the face itself by drawing the rectangles and then attaching them and welding them. Then using the front and left view port I lined up the vertex to create the 3D version of my ear. Then I extruded the edges backwards to get the rear of the ear.
The hard part was reducing the polys in the ear so that when I attached it to the head I wasn't left with any polygons. The guy on the tutorial could only go so far and admitted to having a few triangles hidden behind the ear (triangles need to be avoided to ensure a smooth mesh), but I persevered and managed to make an entire head without a single triangle! (Paul=1, Tutorial guy=0!)
I am quite pleased with my head so far except for the cheek which still need a bit of work. The next step for me is texturing my face. Below are a few shots of my head so far:
Wednesday, 15 October 2008
wk 4: Lights, Lights, action!
Captains log, Star date 569696: I have assigned myself to work on the lighting, as achieve a strobe effect in time to the music will prove quite challenging! So far I have made the lighting rig to hold the lights and experimented with some spot lights to get various disco-lighting! Once I get the room made by Keeley and Amy I can physically attach my rig and start fixing my lights to it.
The tedious part will be timing the lights in the curve editor to flash, but will the help of Adobe flash I will work out when the key points are to allow me to line it all up properly.
We have a rough storyboard to work with that we made last week but I will hopefully draw a neat one up and have it on in time for next weeks blog!
wk 4: 'ear 'ear
Captains log, Star date 569695: I have reached a satisfactory medium with my face so I continued with the back of the head. I did this by drawing a sphere and using the back part as a starting block to extrude the rest of the edges from. I reached some problems when I came to the neck as the guy in the tutorial didn't have a neck where as I do! So I managed to get around that to produce up to the top of the shoulders.
Below is the updated picture of the back of my head and my ear that I made in Flash:
Then using the same method that I did for the face I drew lines as quads then attached them all together and welded them to make sure that they were connected. At this point I had to stop because I got really bad RSI in my thumb due to using my Trackball mouse for too long! I will probably continue with this in a couple of days when I can use my thumb again!
If you have any questions feel free to email me or post on the forums thanks!
Thursday, 9 October 2008
wk 3: Face in 3D
Captains log, Star date 569694: I have followed the next two tutorials to the letter in order to transform my flat mesh of a face into a 3D image by adjusting each individual vertex in both front and left view ports.
After this I added the symmetry modifier to make the other side of the face, Then I added a turbosmooth modifier to smooth the mesh out. To finish this stage off I spent some time adjusting the vertices to better match the contours of my face
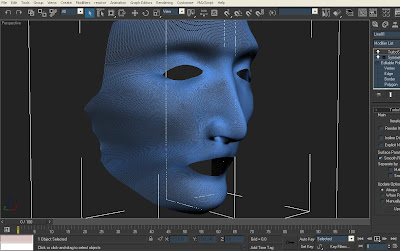
Below Is the mesh that I have finished up with, allowing me to proceed to the next stage in head modeling.
Tuesday, 7 October 2008
wk3: YMCA time
Captains log, Star date 569693: For the YMCA part of this module we were split into groups in order to build an advertisement in 3Ds Max advertising an aspect of the youth work that the YMCA provides, and we have come up with an idea and storyboard (to follow).
Below is an image of our group rolls for this project.
Key
K=Keeley
A=Amy
M=Matt
P=Paul
Below is an image of our group rolls for this project.
Key
K=Keeley
A=Amy
M=Matt
P=Paul
Subscribe to:
Posts (Atom)