Tuesday, 25 November 2008

wk 10: Did you know that lights have bones?

Captains log, Star date 569709: Well yes they do... mine do anyway! The reason I chose to add bones to my light is because when the light case moves the light is linked and so is the chain that holds the light case. But the cable needs to be flexible so when the light case moves the cable needs bend with it so the only answer is to add bones. Below are 5 screen shots of the process that I went through to bone the lights (not all of them were necessary steps!)

1.First off all I drew IK solve bones which is under create>systems>bones. I effectively traced the cable. Then I selected the cable and added a skin modifier and added the bones to the list. This means that when one of the bones moves the cable moves with it as well. This isn't just a link it allows the cable to bend and flex with the bones at the same time.


2.Next I clicked on Edit Envelopes in the skin modifier to edit each bone. This means adjusting the area that each bone affects, in my case I am shrinking each bone's coverage area. The reason I am doing this is to make the movements smoother and flow better. This means that when I move the bones the cable won't do anything unexpected like turn inside out or bend through itself!


3.At the moment each bone is stuck to the bone above it so when it moves only its following bones move which is not what I want. I need the cable to flex from all positions so to solve this I am using a HI solver which connects all of the bones together and allows them to effect each other all the way from one point of the solver to another. In my case that is from the point of the cable entering the case to the tip that is hidden in the lighting rig.


4. The problems started when I linked the cable to the lighting case because when I moved the light case the cable followed the centre of the case and not the point that it enters into the case. As you can see below it messes itself up by turning inside out!


5. My solution was to link the cable to a much smaller object meaning that there will be no room for it to jump about. So I made a small washer and linked the cable to the washer and the washer to the case so when the case moves the washer moves as well and the cable slackens or flexes but because it has to stay linked to the washer it doesn't have the lee-way the jump around, meaning...problem solved!


Now I have done one light I can copy it for the other lights and start to animate them all over again!

P.S. Just for the record I found out that it is possible to add sound to max contrary to one of my previous blogs. Still I found it out a bit late and it is a tricky process so I haven't bothered to follow up on it as my technique (using Flash and Premier pro) is working just fine.

Sunday, 23 November 2008

wk 9: Nay.. not more problems!

Captains log, Star date 569708: Oh yes more problems!


Problem 6.= For some reason the beams of light seem to have all moved up a bit so they are pointing through the objects instead of the holes and yet I never ungrouped them meaning that I couldn't move them without moving the whole light! Unfortunately ungrouping the lights means no animation! I had grouped the spot light with the objects that made up the case so that when I animated them they all moved together. Ungrouping any objects means that the animation is lost, but I had to in order to move the lights up to stop them from looking out of place.
Solution.= Ungroup move the lights and start all over again with the animation process! This time I didn't group the objects. Although grouping tidies the select objects window I will have to do with out and just name them all, which I did anyway I just didn't want to have to scroll down a huge list of names to find what I wanted.

Problem 7.= For some incomprehensible reason max seems out to get me because the smallest a beam of light can go is 0.5 which is fine to get a laser effect as is shown on the left of the screen shot below. The problem is that I would set it to 0.5>test it>fine>move to the next light>set to 0.5>test it>not fine. The previous one has changed to 2.5! this is truly baffling and nothing I can do will stop it from changing it. Now obviously some clever person would give me a quick easy explanation and it would turn out that I am just being an idiot, BUT the real problem was that sometimes it would change it and sometimes it wouldn't. So...
Solution.= I have to change them all, click render and hope for the best! (i.e. max sucks!)


Problem 8.= I took this re-animating opportunity to tighten up the timing of the lighting to the music. It is now a lot better and now fully in time. But Now that I have changed it my previous problems (number 3 and 4) have come back to haunt me! The reason being is because when the new video cuts out and the old one shows the lights are in a different position because I hadn't tampered about with them.
Solution.= The source of the problem is the self-illuminating materials so I would have to render two versions; the first having everything as it should be then the second with the materials removed making the room dark. Then I would have to re-cut the 2 to alternate rapidly in premier pro again to achieve the flashing/strobe effect. This should solve the problem as is currently shown below.

Wednesday, 19 November 2008

wk 9: Its not all bad

Captains log, Star date 569707: After discussing as a group whether changing all of the materials would be a good idea we came to the conclusion that although it would set us back and cost more time it will pay off due to a more consistent look to the whole animation with materials added.
In the end I think that this will turn out to have benefited us because it came up in our talks that the easiest way to make an advert with people in it would be to film it in real life. So by actually adding a cartoon feel to the animation will give a slant to the advert that filming cannot achieve so using 3D modelling software will have been justified.
It was fortunate that when we were discussing how to achieve this effect that I had remembered my previous experience with similar effects in 3Ds max. Last summer I was experimenting with materials when I came up with a form of simplifying the colours to make the scene seem like a cartoon. After some research on the internet I then found out that this was called cell shading and I found that a falloff filter on the material adds a black outline to the objects which reinforced my previous findings to create a cartoon effect. I then found a tutorial on the internet that had a more advanced version of mine that made the material react to the light when the light changes, but it isn't really needed for our project as the walls would seem as if they are moving!
Finally Matt reminded us that a humorous, cartoony would appeal more to the Target Market Group that we are aiming for which are teenagers. So an advert like this is more likely to catch their eye and make them want to watch and hear what it has to say as they are more likely to relate to an advert that appears to have been made for them instead of an advert made at them.

Tuesday, 18 November 2008

wk 9: Problems ahoy captain!

Captains log, Star date 569706:Today I have had roughly 5 problems, some of them more annoying than others. These being:

Problem 1.=As a group we gathered and discussed our progress today. I had done the rooms and showed the group, but Matt brought up the observation that his characters although brilliantly made will not fit in. This is because it is much easier to make props, rooms and lights look realistic whereas attempting to get photo-realism in people is a whole different kettle of fish. We discussed whether it was possible to get everything looking to a level standard of realism but we all agreed that cartoony-looking characters would stand out from a textured background.
Solution.= Our solution was to adjust the rest of the scene to look more like a cartoon.

Problem 2.=The next problem was getting an effective cartoon look without making it look like we just added colours to everything rather than materials. Getting a 3D animation to look in the style of a cartoon is trickier than it sounds because cartoons generally have block colour but with 3D lighting there will be gradients and shadows which may look out of place.
Solution.= It was then that I thought that if most of the objects were outlined in black then it would look a lot more like a cartoon as that is how most cartoons appear. It was then that I stumbled upon cell shading! This involved giving the material its own illumination and restricting the amount of colours it radiated thus eliminating 3D looking gradients this reminded me of a old computer game that looked like this style which is probably where I subconsciously got the idea from! As you can see from the image below not everything is outlined but enough to look good!


Problem 3.=After much materialising below is a shot of the room as it stands now once I had changed all the materials!


The above shot shows a test that I made on the lighting rig but I have just realised that the top beams have dropped somehow, so this will need changing! Nevertheless I think it looks quite good! and below is a comparison video of now and after I made the material changes:


So all good? I think not! Unfortunately to get the reduced colours everything has to be self-illuminating, thus screwing up my flashing Omni lights! Because it was the Omni that provided the light to the room originally, when it went off the room went dark. But now because the room lights itself the dimming Omni has virtually no effect!
Solution.= It was then that I came up with the solution of cutting and fading in Premier Pro instead of 3Ds max. This would involve cutting out the sections that are meant to be dark and using a black box to fade in and out over the top for the fades. Below is a screen shot of what I did in premier pro.

The above shot is the first cut-job which cuts to black between each flash. The shot below shows the cut up video above the original covering up the fact that the lights disappear with the omni light.


Problem 4.= After doing this I then came upon another barrier! In the original when the Omni went out the room went dark but the lasers and lights remained. Unfortunately when I cut out the sections of darkness to leave a blank/black spaceting how to in Premier Pro the lights went as well. This meant that the movement of the lights looked a lot less real and convincing as it looked liked they were jumping rather than just moving.
Solution.= Luckily whilst I was testing how to overcome this problem I cut the new cell-shading version above the old textured version. This meant that when the Omni was on you could see the cartoon-room and when the Omni went out and I cut the section out you could see the old textured room. Because you only see the dark versions of the old room the textures aren't visible but the lasers and lights are, thus solving my problem because the lights remain constant and its the room that changes! Solution is below:


Problem 5.= This works for and Omni that turns on/off but some of my scenes have a dimming light instead. This is a problem because I was originally going to have a black box fade in over the top giving the effect of a dimming room. Unfortunately I am left with the same problem as before which was that when the room dims/disappears so do the lights which is not what I want.
Solution.= Regrettably I have so far only come up with a few half-solutions. These being either;
1. Dim the scene in Premier Pro rather than fade in a box over the top.
2. Hope that it is possible to animate the self-illumination on the materials in 3Ds max so that they can dim in sync with the Omni light. This will be time consuming though.
3. Don't fade!

wk 9: Compression-succession!

Captains log, Star date 569705: I finally managed to compress the files so that they became upload-able. Strangely enough combining them made a smaller file size than any single separate file! Bizarre I know. Anyway enjoy: (my appologies for the length as it took about 3 hours for the full version to not-load and crash at about 20% of the way through, but heres a taster anyway!)


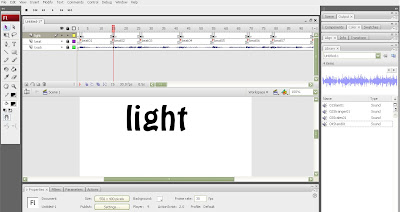
Also to go into more detail on an earlier blog I have added a screen shot of what I did in flash in order to get accurate representations in terms of timing the lighting to the songs.


The reason I used Flash was to find out where each beat on each song corresponded in terms of frames. It can't be done (to my knowledge) in 3Ds because you can't import sound tracks, so I chose to use Flash. What I did was to import all four tracks into the library, then I put the sound on its own layer and made sure that Flash's frame rate was set to 30 like 3Ds max. Then I played the song over and over until I had a blank keyframe for each beat. After this I just put the word light on each keyframe that landed on a beat so that when I played it again it was easier to see whether the flashing Omni light would fit to the beat.

Monday, 17 November 2008

wk 9: Timing is everything!

Captains log, Star date 569704: I have successfully managed to line up the soundtracks which I cut down to be in time with the animation from 3D max. I managed this using 3Dsmax for the modelling, Flash for the keyframing and finding the beats and finally premier pro for the mixdown of test versions. The rendering time is already very long and that is without lots of characters jumping around throwing props! so I foresee some problems in the near distant future, so we will have to set aside extra time to allow for the lengthy rendering process.
Although having said that each room/scene lasts for about 11 seconds which will work out to be too long anyway so they will inevitably need cutting down some more anyway.

Matt has done well modelling his characters with varying clothes and he was going to add the head this week (week 8) but it would seem that to animate all of them will take a very long time, and now that I have finished modelling and lighting the room I will probably help with that character animation as I have some unfinished business with the biped bone structure! (see www.genericsoftwaretwo.blogspot.com/ week nine's post). I am going to try and compress-the-monkeys out of my .avi files to see if I can get them below 100mg so that I can upload them in my next post.

Amy and Keeley will are continuing to completely model all of the props and texture them so they do not stand out with the rest of the textured scenes.

Tuesday, 11 November 2008

wk 8: Sound editing

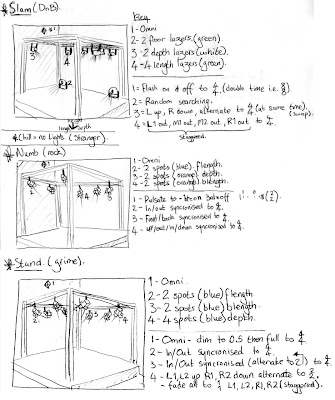
Captains log, Star date 569703: I have fulfilled what I said I would complete last week which was listed in my last post. I have made all of the rooms and textured them. I have also made some quick animations to test each of the lighting displays. I also cut the tracks down to 11 second segments to allow for a manageable amount to animate.

After this I drew a storyboard to help me work out what the lights will be doing for each song. I have grouped the lights to each lighting rig beam to make it easier to animate. I then decided where each light will point and move to and how fast.

When it comes to the animating of the lights I will move the sound tracks into flash to get the key framing accurate.

Below would be the videos of my lighting animations that I made before storyboarding as a test to check it would all work nicely but the file sizes are too large alas! Fortunately a picture of my lighting storyboard is below to show what will be happening with my lights, if you can decipher the short hand and musical jargon.


Thursday, 6 November 2008

wk 7: animated lights

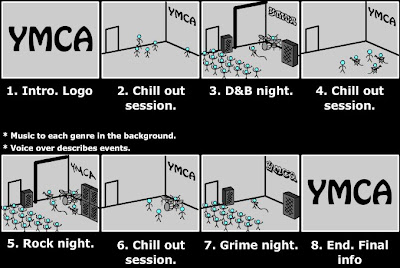
Captains log, Star date 569702: After our group visited the YMCA we decided that there were aspects that needed updating and we chose to concentrate on the musical aspect of their outreach as the advert would have to be quite long to display all the different aspects of the YMCA's outreach.

Even though I've just released our storyboard it changed a couple of days ago! So Below is the updated version of the storyboard which I made in Flash. The main difference is that instead of the music scens switching to an empty room it switches to the chillout room instead. This means that there aren't any wasted empty scenes and the chillout evenings can be split up into the various activities such as guitar jams, drum lessons and general chillin'!


For next Tuesday I hope to have all of the rooms created and lighted ready for the other people in my group to give me the models to put in the room.

So far the work to be done for next Tuesday is as follows:

Me:Create all four rooms and texture them. Also fully rig and light each of the rooms.
Amy:To make the instruments (guitars, drums and mics) modelled and textured.
Keeley:The speakers, tables and chairs modelled and textured.
Matt:One character fully boned and clothed (textured), if time two characters.

We also picked the songs that we are going to use as backing tracks for each scene. We chose them early so that the sound wasn't left till the last minute. The songs are:

1. Drum and Bass-Pendulum, slam.
2. Chill out evenings-Foo fighters, stranger.
3. Rock nights-Linkin park, numb.
4. Grime time-Dizee rascal, stand up.

So far lighting has been kind to me, even though I have been dabbling into the realm of advanced lighting. I'm fine with modelling and texturing is becoming easier and easier but complex lighting really gets my goat! What I have done so far amazes me so the learning curve I have taken to accomplish this so far is quite amazing.

Usually I'm okay with a few Target spot's and an omni but getting lasers was quite tricky and max was playing me up at first, but effectively all I need to do is create a target spot and put the intensity up high and pick a colour, then adjust the gizmo to make the beam of light really small. After doing this I'm still left with a spot on the floor and no beam of light. To remedy this I add a special effect volume light, and then after fiddling with the settings I have my shaft of light!

The next problem I have to overcome now is timing the flashing lights and the movement to the music. Hopefully I will overcome this problem!